[Spring] Bean등록
지난번 포스팅에서 DI의 방법에 대해 알아보았다. 의존성 주입을 해주기 위해서는 Bean등록을 해주어야하는데 이번 포스팅에서는 그 방법에 대해서 알아보자
[Spring] DI의 방법
지난 포스팅에서 DI에 대해서 알아보았다. 그렇다면 이제 의존성 주입을 하는 방법에 대해서 알아보자. [Spring] DI (Dependency Injection) DI Dependency Injection 스프링의 근간을 이루는 중요한 개념 스프링4
psh0036.tistory.com
Bean 등록방법
우선 예제코드를 만들어보자
Service클래스 , ServiceRepository클래스
public class Service {
	ServiceRepository serviceRepository;

	public Service(ServiceRepository serviceRepository) {
		this.serviceRepository = serviceRepository;
        	System.out.println("DI정상 실행");
	}
}
1. 스프링 설정파일에 직접등록
가장 원초적인 방법으로 context파일에 직접 등록하는 방법
<bean id = "Service" class="com.blog.blog.Service">
	<constructor-arg ref = "sp"></constructor-arg>
</bean>

<bean id = "ServiceRepository" class="com.blog.blog.ServiceRepository">
</bean>
context파일에 해당코드를 입력
제대로 등록되었는지 검사해보자!
public class MainClass {

	public static void main(String[] args) {

		ApplicationContext context = new ClassPathXmlApplicationContext("applicationContext.xml");
		String[] beanArr = context.getBeanDefinitionNames();
		System.out.println(Arrays.toString(beanArr));

		Service service = (Service)context.getBean("Service");

		System.out.println(service.serviceRepository != null);

	}

}
출력화면 :
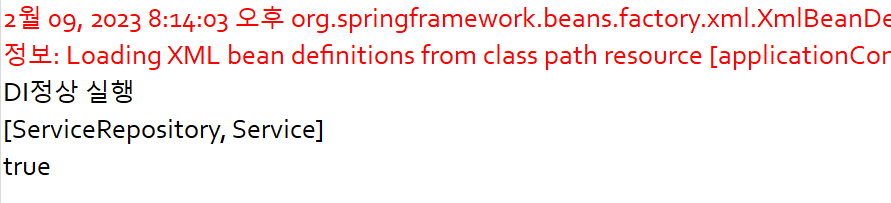
잘 작동하는 모습을 볼 수 있다.
2. 어노테이션을 이용하는 방법
Component-scan을 이용하여 @Component, @Service, @Repository, @Controller, @Configuration 이들중 하나라도 달려있는 클래스를 찾아 설정파일에 자동으로 bean등록 해줍니다.
context파일 :
<?xml version="1.0" encoding="UTF-8"?>
<beans xmlns="http://www.springframework.org/schema/beans"
       xmlns:xsi="http://www.w3.org/2001/XMLSchema-instance"
       xmlns:context="http://www.springframework.org/schema/context"
       xsi:schemaLocation="http://www.springframework.org/schema/beans http://www.springframework.org/schema/beans/spring-beans.xsd http://www.springframework.org/schema/context https://www.springframework.org/schema/context/spring-context.xsd">

    <context:component-scan base-package="com.blog.posting" />


</beans>
ServiceEx 및 ServiceRepository클래스 :
@Service
public class ServiceEx {
	ServiceRepository serviceRepository;

	@Autowired
	public ServiceEx(ServiceRepository serviceRepository) {
		this.serviceRepository = serviceRepository;
		System.out.println("DI정상 실행");
	}
}
@Repository
public class ServiceRepository {
public void print() {
}
}Main클래스 :
public class MainClass {

	public static void main(String[] args) {
		ApplicationContext context = new ClassPathXmlApplicationContext("applicationContext.xml");
		String[] beanArr = context.getBeanDefinitionNames();
		for(String st : beanArr) {
			System.out.println(st);
		}
		ServiceEx service = (ServiceEx)context.getBean("serviceEx");
		System.out.println(service.serviceRepository != null);
	}

}
출력 화면 :
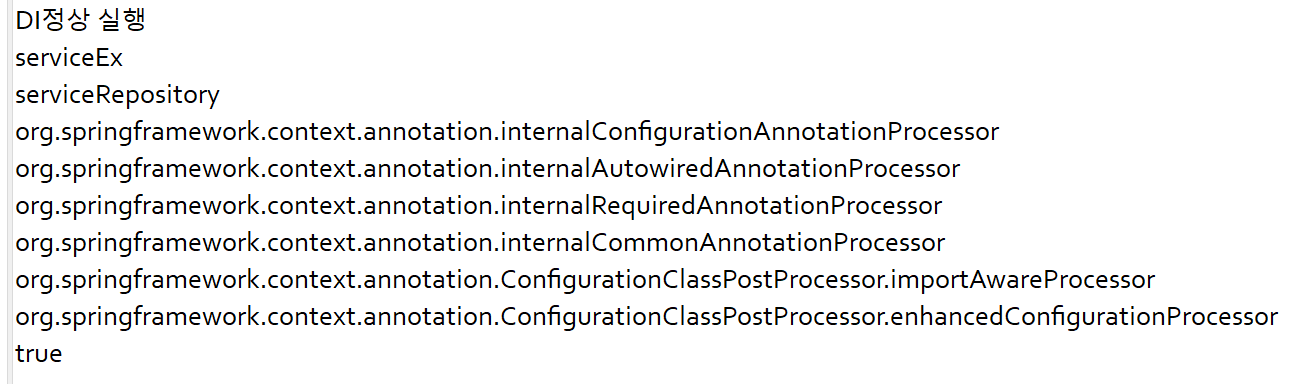
정상적으로 Bean등록이 된것을 확인할 수 있다.
3. 자바 설정파일 + @ComponentScan 어노테이션 사용
방법1처럼 자바설정파일을 따로만들어 하나하나 적어주는 방법도있지만 그것은 생략하도록 하고 자바설정파일+@ComponentScan 어노테이션을 사용하면 파일을 쭉 스캔하여 자동 등록해준다.
다만 설정파일을 resources폴더가 아닌 스캔할 패키지 안에 만들어주어야한다.
설정파일 :
import org.springframework.context.annotation.ComponentScan;
import org.springframework.context.annotation.Configuration;

@Configuration
@ComponentScan
public class JavaContext {

}
ServiceEx 및 ServiceRepository클래스는 위와 동일
Main클래스 :
public class MainClass {

	public static void main(String[] args) {

		ApplicationContext context = new AnnotationConfigApplicationContext(JavaContext.class);
		String[] beanArr = context.getBeanDefinitionNames();
		for(String st : beanArr) {
			System.out.println(st);
		}
		ServiceEx service = (ServiceEx)context.getBean("serviceEx");
		System.out.println(service.serviceRepository != null);
	}

}
실행결과 :
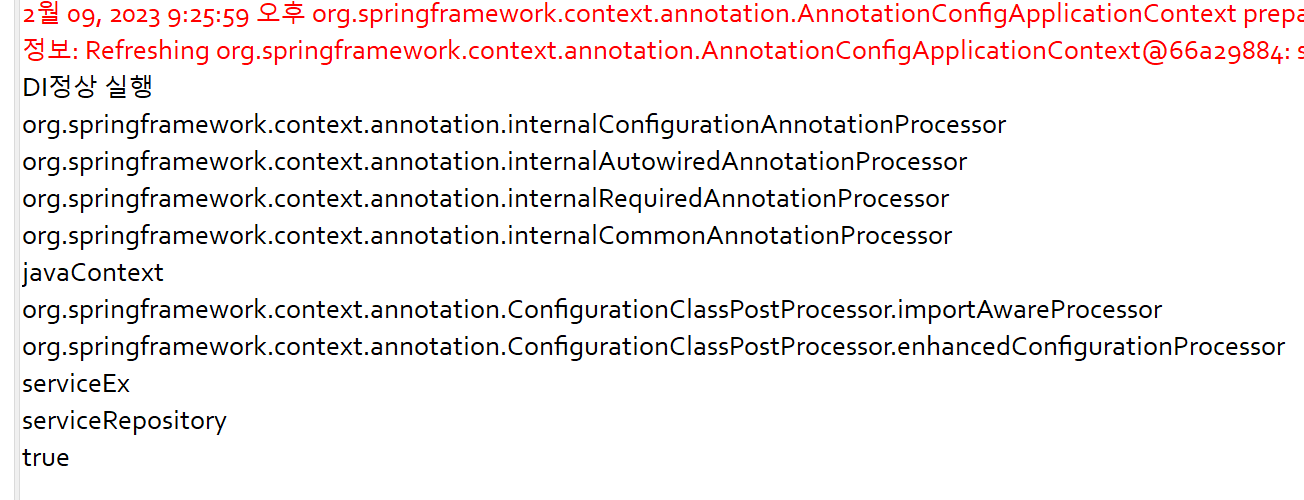
정상적으로 등록이 된 모습이다.